I always add a straight grain line to the papers as I find it helps to keep them all in the same direction when piecing them together. I also pin on that line in the centre.

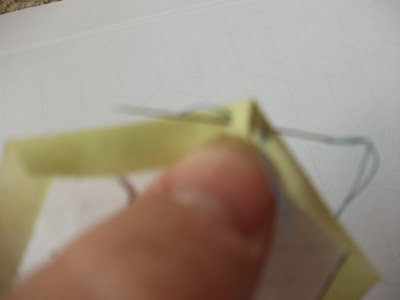
Now fold over the top edge above that line and finger press a crease. Fold over the next corner and make a mitre, use your thumb to hold it in place. Put a knot in the end of your thread and make a stitch through the layers of that corner. You are only going through the fabrics on the top of the paper and not through the paper itsself and the other side which is the traditional way.

Take a back stitch at the corner to secure it in place.
Go to the next corner and turn the edge over and finger press the crease and mitre the corner again. This time you are just going to make that stitch in the corner. You will have a long stitch over that seam.

Again take a back stitch through the layers at the corner.

Repeat until you have secured all the edges. You can go back to the very first edge and do another back stitch but I don't think it is necessary, but I am always prepared to revise any ideas. The stitches keep the paper quite secure. Remove the pin. You can also remove the pin at the last edge if you think the template has shifted a little, it prevents it from bunching up.

On the right side you will have no tacking threads but a perfectly prepared hexagon.

I would keep the paper template in place until it is stitched and surrounded by other hexagons. The paper is easily removed.

Preparation is very quick this way. It is not the only way to stitch a hexagon and I would say try them all until you find the one that suits you best. Hope this helps.
Happy stitching.
Love Shirley.
Thanks for the tutorial, looks a nice easy way of doing it.
ReplyDeleteHi Shirley, Great tutorial!
ReplyDeleteThanks Shirley that was clear and easy to follow. When my hexie turn comes I will have the benefit of your experience. You make it look so easy.
ReplyDeleteI prepare my hexagons almost exactly as you do, except I do stitch through the fabric & template in the middle of one side -- then I back stitch all the corners on the back. I think I saw this version somewhere on YouTube.
ReplyDeleteI agree with you --beginners should try different versions and see which just feels the best.
Thanks for the tutorial!
ReplyDeleteIsn't this way a super time saver?!
ReplyDeleteI can't believe how much time I wasted before I knew this technique...
Great tutorial, Shirley?
Any more thoughts on the border?
:)
Great directions! Guess the backstitch concept would work equally well for different shapes - am thinking of those lovely klosjes here ...
ReplyDeleteYou don't go through the paper at all? I have yet to actually make a hexi (but I will!). Meantime I'm learning how by reading. Thanks!
ReplyDelete